| Health Points | 300 (150 x |
| Attack Strength | Ranged: 1 ( Melee (Both Phases): |
| Drops | 1 Tarantula Boss Trophy |
| First Appearance | 0.2pre10 |
Description[]
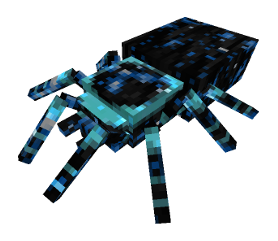
The Tarantula Brood Mother is the Erebus' first boss mob. It has 300 health (150 hearts).

The Brood Mother waiting at the top of the tree.
Behaviour[]
Tarantula Brood Mothers only spawn in Giant Eucalyptus trees, found exclusively in Ulterior Outback. They will sit in the center of their arena until the player gets within detection radius. Once a player is spotted, the battle begins, consisting of two phases.
Phase 1[]
The ranged phase. In this phase, the Brood Mother is completely immobile, and can only attack you through jumping in place, dealing an amount of damage dependent on difficulty (see Mob Box above). This attack is similar to the Jump Slam of the Antlion Overlord, inflicting damage and sending the player into the air high enough to deliver another half a heart of damage.
The Jump Slam, like the Antlion Overlord, inflicts Slowness for a short period (7 seconds), but unlike the Overlord also inflicts Blindness for 4 seconds.
Furthermore, the Brood Mother will lob eggs at the player that inflict no damage. Instead, they spawn two Tarantula Babies that will pursue the player. These babies are not spawned in Phase 2.
The blue shield surrounding the Brood Mother prevents damage with melee weapons; only splash potions and ranged weaponry can inflict damage.
Tips[]
- Slaughter the Tarantula Babies whenever they spawn. They have minimal health and will only cause you grief.
- If you stay away from the Brood Mother herself, you won't cop damage from her Jump Slam. The radius is approximately 5 blocks from the Brood Mother.
- Augmented Scorpion Pincers are better for this fight than any kind of bow (including Maximum Speed Bows) as they do not slow you down and can ignite the Brood Mother, but require Fire Charges to use.
- If you are able to, you can scale the outside of a Giant Eucalyptus Tree rather than go through the inside. If you do so, you can rain arrows down upon the Brood Mother from an unreachable ledge above her arena, practically skipping this phase of the fight entirely.
- You may also use the stackjump technique (i.e. place blocks under yourself as you jump) once reaching the arena to reach the upper ledge, allowing you to use the same tactic without scaling the outside of the tree.
- If you have Galacticraft installed, the Grappling Hook is useful for reaching the upper ledge without entering the tree, assuming the roof of the Erebus is low enough for you to latch on to.
Phase 2[]
The melee phase. Once the Brood Mother's health drops below half (i.e., 150 health or 75 hearts), it will begin Phase 2, where it drops its melee shield and changes colour from blue to orange.
This phase is arguably more dangerous, as the Brood Mother will begin to actively pursue the player. It becomes immune to all ranged weaponry and splash potions once Phase 2 begins, but melee weapons will be able to damage it.
The melee damage dealt by the Brood Mother in this phase is identical to that done by its Jump Slam attack during Phase 1, albeit without the additional half a heart of fall damage. As it pursues the player, it will fire poisonous barbs/sludgeballs (it's difficult to discern what they are) that deal half a heart of damage and inflict Poison for 6 seconds. This poisoning, combined with its rather high pursuit speed and solid melee damage, make the Tarantula Brood Mother a dangerous foe.
Tips[]
- Memorise the floor pattern as best you can. This fight will either result in you going in circles along the Silk part of the floor with the Brood Mother in tow (which in itself can result in you falling into the webbing in the floor, immobilising you) or with you being pinned against a wall wailing on the Brood Mother as fast as you can.
- A melee weapon with Knockback II is capable of keeping the Brood Mother at bay, so you don't need to move. Occasionally, her speed will allow her to get a hit through, knocking you back.
- It is advised to take some Anti-Venom with you to counter the poisonous barbs of this phase, unless you have an enchanted Diamond-tier or better melee weapon to eliminate the spider quickly (e.g. Wasp Sword, Quake Hammer, etc.)
- Potions of Strength II are your ally in this phase. Remember, this is 1.7.10, before the nerf; they will more than triple your damage output in this version.
Death[]
When the Brood Mother is defeated, she will flip over on her back and begin bouncing up and down repeatedly whilst shaking, eventually exploding in a shower of experience. This is akin to how most spiders die in reality; minus the bouncing, loud wails, and explosion of experience.
The screams sound like the cry of a Ghast, but altered to sound slightly slower and far deeper in pitch. Once you're done enjoying the fireworks show and theatrics of the dying Brood Mother, she will leave behind a Tarantula Egg and Tarantula Boss Trophy. Congratulations! You've taken down the first boss of the Erebus!
Trivia[]
- The first boss of the Erebus was originally planned to be the Antlion Trove Guardian, but it was downgraded to miniboss status.
- However, this miniboss has made a comeback as a fierce boss in the form of the Antlion Overlord, in addition to remaining a miniboss in itself, albeit slightly altered.
- The Ghast-like wails of the dying Brood Mother seem to resemble that of the Ur-Ghast from the Twilight Forest Mod.
- The Brood Mother stands at around one and a half blocks tall, and approximately 5-6 blocks long, whilst being approximately 4 blocks wide.
- The Brood Mother has no collision detection for mobs and players in Phase 1; the player can walk straight through her with impunity.